
The Definitive Solar Panel Installation Guide for Pros and Homeowners
A successful solar panel installation is won or lost long before the first panel is unboxed. For installers, EPCs, and savvy homeowners, project success hinges on a detailed, executable plan that moves from a general idea to a concrete blueprint, addressing the real-world frictions of procurement, compliance, and ROI.
This guide provides an actionable, step-by-step framework for every stage of a solar project. It is designed for both the professional contractor navigating complex U.S. electrical codes and the homeowner seeking a seamless, turnkey installation. We will cover the critical pre-installation assessment, component selection, structural mounting, electrical wiring, and final commissioning—all grounded in current market realities and best practices.
Your Pre-Installation Project Blueprint
Before any hardware is ordered or a single boot hits the roof, a meticulous planning phase is essential. This is where you, whether you're a contractor, developer, or homeowner, establish the operational and financial viability of the entire project. This stage is non-negotiable for mitigating risk, preventing costly change orders, and aligning expectations. Every decision made here directly impacts performance, safety, and long-term ROI.
- For Installers: This is where you lock in profitability. A standardized assessment process prevents return trips for missed details (like main panel capacity or rafter spacing) and builds the accurate BOM needed for a sharp, competitive quote.
- For Homeowners: This is your chance to ensure the system is sized correctly for your needs, both now and in the future (e.g., adding an EV or heat pump). Understanding this stage helps you ask your installer the right questions.
Core Planning Components
Projects that rush this phase run into predictable—and expensive—problems. The blueprint phase boils down to three critical areas.
- Site Viability: This goes way beyond a quick glance at the roof. A professional evaluation means checking the structural integrity of the rafters, knowing the remaining lifespan of the shingles, and using tools like a Solar Pathfinder to map sun paths and potential shading from trees or adjacent structures, as required by NEC 690.7.
- System Sizing and Energy Needs: Sizing a system correctly is everything. You need to analyze at least 12-24 months of the property's utility bills to understand the real energy consumption. This data dictates the necessary kilowatt (kW) capacity to meet the energy offset goal, ensuring the system isn't oversized and wasteful or undersized and disappointing.
- Regulatory and Utility Compliance: This is where projects get bogged down. It involves identifying the specific permitting requirements of the local Authority Having Jurisdiction (AHJ), securing an interconnection agreement with the utility (which can take weeks or months), and satisfying any Homeowners’ Association (HOA) rules.
The Current Market Context
Navigating the U.S. solar market means staying on top of its dynamics. In the first quarter of 2025, the industry installed an impressive 10.8 GWdc of capacity. But that growth wasn't spread evenly.
While the utility-scale segment soared, especially in states like Texas and Florida, the residential sector actually saw its lowest installation numbers since 2021. This was largely due to economic headwinds and policy shifts like California's NEM 3.0, which just underscores how critical localized planning and understanding regional incentives are.
To get a handle on the complexities of scheduling, from permit approvals to material delivery, it's worth learning about creating effective project timelines to keep your installation on track.
Expert Tip for Installers: Create a standardized pre-installation checklist you use for every single project. It should include fields for roof pitch, azimuth, shading analysis, electrical panel capacity, and local AHJ contact info. This simple tool prevents frustrating return trips and ensures every assessment is thorough and consistent. Portlandia Electric Supply can provide templates to streamline this.
Key Pre-Installation Assessment Checklist
This checklist covers the critical assessment points for determining site viability, system sizing, and regulatory compliance before any work begins.
| Assessment Area | Key Considerations for Installers | Key Considerations for Homeowners |
|---|---|---|
| Site Viability | Roof structural integrity, roofing material condition and age, detailed shading analysis (using tools like a Solar Pathfinder), and available roof space. | Any known roof issues (leaks, age), plans for major landscaping changes, and awareness of HOA restrictions on panel placement. |
| System Sizing | Analysis of 12-24 months of utility bills, customers' future energy plans (e.g., EV charger, pool pump), and main service panel capacity. | Providing complete and accurate utility bills, communicating any anticipated changes in electricity use. |
| Regulatory Compliance | Identifying the correct AHJ, understanding local permitting processes and timelines, researching utility interconnection requirements and application fees. | Signing necessary utility paperwork, being aware of any neighborhood covenants or HOA aesthetic rules. |
A detailed plan also involves sourcing the right components. For a deeper dive, check out our guide on the best solar panels for your project. This foundational knowledge ensures that from day one, your project is built on solid ground.
Assembling Your Solar Toolkit and Components
Once your plan is solid, it's time to gather the gear. This is where your project moves from paper to reality, and the choices you make now will directly affect your system's safety, performance, and lifespan. We're not just talking about panels and inverters; this is about the complete balance of system (BOS)—every wire, bolt, and bracket that brings it all together. For contractors, smart procurement is the key to profitability. Getting the right components at the right time impacts everything from labor hours to code compliance.
Panels and Inverters: The Heart of the System
The panels and inverter are the most visible parts of any solar array, but brand selection should be driven by project-specific requirements and compliance.
- Solar Panels: The classic debate is between monocrystalline and polycrystalline panels. Monocrystalline panels (e.g., from brands like Qcells or REC) are more efficient and have a sleek, uniform black look, making them ideal for smaller roofs where maximizing every square foot is critical. Polycrystalline panels are less common now but can be a cost-effective option for larger arrays with ample space.
- Inverters: This is the brain of the operation. A traditional string inverter, like those from Fronius or SMA, is a workhorse and a cost-effective choice for wide-open, unshaded roofs. For roofs with complex angles or intermittent shading, microinverters (from Enphase) or power optimizers (from SolarEdge) are superior. These Module-Level Power Electronics (MLPEs) let each panel work independently, so one shaded panel won’t drag down the performance of the whole system, and they are essential for meeting NEC rapid shutdown requirements.
Racking, Wiring, and Safety Gear
The parts you don't always see are just as critical. The balance of system (BOS) hardware holds your system together and keeps it running safely for the next 25+ years. Cutting corners here is a guaranteed path to costly failures.
The racking (e.g., from IronRidge or Unirac) is the skeleton of your array, and it absolutely must be matched to your roof type. A standing seam metal roof needs entirely different mounting hardware than a composition shingle roof. Using the wrong clamps or failing to properly flash every single roof penetration is one of the biggest causes of leaks and structural damage.
The wiring is just as crucial. The National Electrical Code (NEC) mandates the use of properly gauged, UV-resistant PV wire. Undersized wires can overheat and become a serious fire hazard. You'll also need AC and DC safety disconnects, which are non-negotiable for firefighter safety per NEC 690.15.
Pro Tip for Contractors: Simplify your life and protect your profit margins by bundling your components. A single-source supplier like Portlandia Electric Supply can consolidate your panels, inverters, racking, and all BOS components into one shipment. This slashes logistical headaches and gets everything to the job site at once, preventing costly delays. Our PowerLink service can even match you with qualified local installers.
The Essential Tools for Installation Day
A well-stocked toolkit ensures the job gets done safely, to code, and on time.
| Tool Category | Essential Items | Purpose |
|---|---|---|
| Safety Equipment | Hard hat, safety glasses, fall protection harness, insulated gloves. | Non-negotiable for working at height and around live electricity. Required by OSHA. |
| Measurement & Layout | Tape measure, chalk line, level, stud finder, roof plan. | Guarantees your mounting feet hit the rafters and your array is perfectly aligned. |
| Drilling & Fastening | Cordless drill, impact driver, full socket set, torque wrench. | A torque wrench is critical. Over-tightening bolts can crack a panel frame, while under-tightening can lead to disaster in a windstorm. |
| Electrical Work | Wire strippers, crimpers (for MC4 connectors), multimeter, conduit bender. | For building secure, weatherproof connections and verifying voltage and polarity before commissioning. |
When you have all these components and tools laid out and ready to go, your project stops being just a plan. It becomes a tangible, deployable asset, ready for a smooth and successful installation.
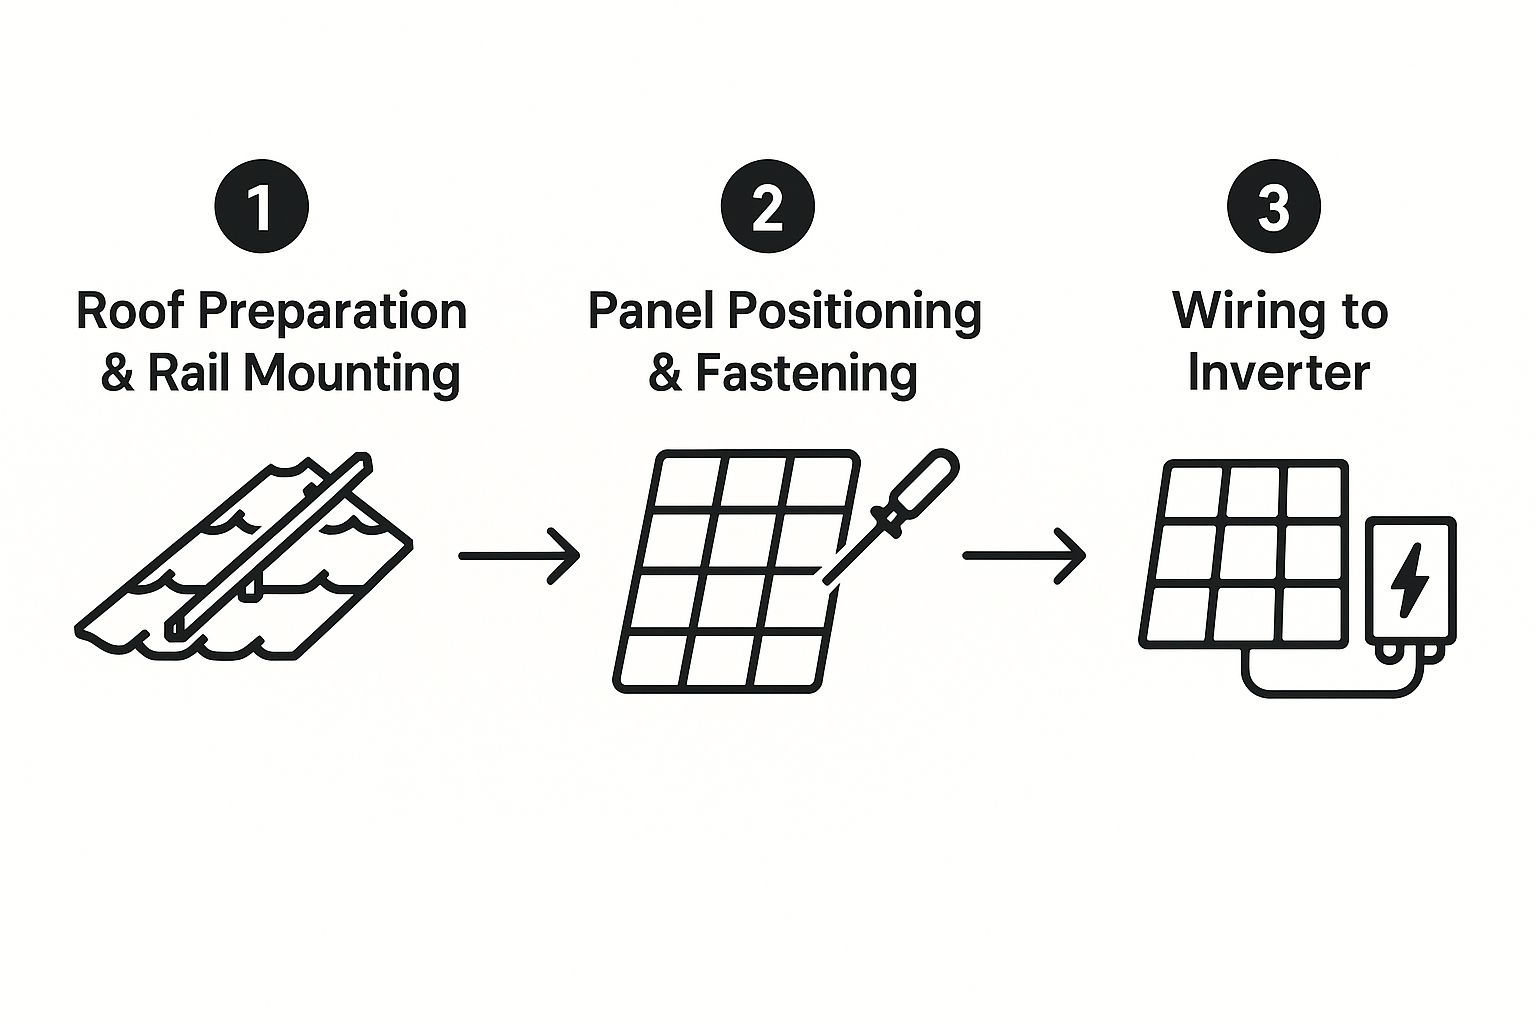
The Structural Work: Mounting Racking and Panels

This is where the racking meets the roof. All that careful planning is about to become a physical reality. The structural work is the absolute backbone of your solar array, and there’s no room for error. Precision and safety are non-negotiable; this system needs to last for decades and withstand local wind and snow loads.
Locating Rafters and Installing Mounts
First, you absolutely must locate the structural rafters. Your racking system has to be anchored into solid wood, never just the roof sheathing. The sheathing simply can't handle the load and uplift forces. Grab a good stud finder and chalk line to map out every rafter where a mounting foot will go, per your approved engineering plans.
With your anchor points marked, the next critical task is ensuring every penetration is 100% weatherproof. Each hole you drill is a potential leak. You'll need to meticulously install flashing specifically designed for your roof type—whether it's composition shingle, tile, or metal.
Critical Mistake to Avoid: Never use generic flashing. Using asphalt shingle flashing on a standing seam metal roof is a guaranteed path to leaks, structural damage, and voided warranties. Always follow the racking manufacturer's manual to the letter to stay compliant with building codes and keep your warranties intact.
Assembling the Racking System
Once the mounting feet are securely bolted into the rafters and perfectly sealed, it’s time to build the frame. The racking rails create the sturdy platform that will hold your solar panels for the next 25-plus years.
Pay close attention to your layout. The rails must be perfectly parallel and level. It’s not just about aesthetics; proper alignment ensures even weight distribution and prevents stress on the panel frames. You must also account for thermal expansion. The manufacturer’s guide will specify how much of a gap to leave between rail sections—don't skip this detail.
The incredible growth in solar is a testament to how reliable this technology has become. In a recent historic surge, the world installed roughly 597 GW of new solar capacity in just one year, pushing the global total past an astounding 2 terawatts. This boom is fueled by smart policies and dropping equipment costs.
Lifting and Securing the Panels
This is the moment of truth—getting the panels onto the racking. This is a two-person job, minimum. Solar panels are bulky and awkward, so use proper lifting techniques to protect your back and the equipment.
With a panel in place, you'll secure it with mid-clamps and end-clamps. Now, your torque wrench becomes the most important tool in your bag. Every clamp has a specific torque value from the manufacturer, and hitting it precisely is crucial.
- Overtightening is a real risk. You can crack the panel's glass or warp the aluminum frame, which will instantly void your warranty.
- Undertightening is just as bad. It can allow panels to rattle, shift, or completely detach in high winds.
Always follow the torque specs in the installation manuals for both the panels and the racking. For a closer look at the different kinds of hardware, check out our guide on choosing the right solar panel mount system for your project.
Wiring Your System From Panels to the Grid
The mounting hardware is secure, and the panels are on the roof. Now comes the part where we turn a bunch of components into a functioning power plant: the electrical wiring. This is where precision is everything. A single bad connection can sink your whole project, so absolute attention to detail and strict adherence to the National Electrical Code (NEC) are non-negotiable. You are building a safe, durable pathway for electricity to flow for decades to come.
Connecting Panels and Managing Conduit
On the roof, you'll connect the panels in series, creating "strings." It’s a simple daisy chain—the positive MC4 connector from one panel clicks into the negative of the next. This builds up the voltage to a level the inverter can work with efficiently.
Wire management is critical. Use UV-resistant clips to secure all wiring to the racking itself. Never let cables rest on the roof surface; heat and abrasion will destroy them over time. These strings then feed into a rooftop junction box, which neatly combines the circuits before they head down to the ground equipment.
The conduit run from that junction box down the side of the house is your system's main artery. It has to be perfectly watertight and securely fastened to the building to protect the critical PV wiring inside.
The Inverter and Disconnects
At ground level, you’ll find the inverter. Its job is to take that DC power from the panels and convert it into the AC power your home uses.
The DC wiring from the roof doesn't go straight into the inverter. First, it hits a DC safety disconnect. This is a crucial switch that allows firefighters to completely cut off the power coming from the panels, per NEC requirements. From there, the lines run into the inverter. The inverter then sends AC power out to another disconnect—an AC disconnect—before it finally heads to your main service panel.
Pro Tip for Installers: Always double-check your string voltage against the inverter's maximum input voltage. A cold, sunny morning can cause panels to overproduce ("cold-weather Voc"), and if that voltage spike exceeds the inverter's limit, you’ll fry it. Use the panel's Voc and temperature coefficient specs to do the math before you connect anything.
To get a better handle on the different types of inverters, check out our comprehensive guide on solar inverters.
System Component Wiring Connections
This table outlines the primary electrical pathways, from the panels all the way to your home's electrical system, with key NEC references.
| Connection From | Connection To | Typical Wire/Cable Type | Key Compliance Note (NEC) |
|---|---|---|---|
| Solar Panel (Series) | Rooftop Junction Box | PV Wire with MC4 Connectors | Use UV-resistant, listed PV wire. NEC 690.31(B). |
| Rooftop Junction Box | DC Disconnect | THHN/THWN-2 in Conduit | Conduit must be properly sized and watertight. |
| DC Disconnect | Inverter DC Input | THHN/THWN-2 in Conduit | Disconnect must be readily accessible. NEC 690.15. |
| Inverter AC Output | AC Disconnect | THHN/THWN-2 in Conduit | Sized based on inverter's max continuous output. |
| AC Disconnect | Main Panel Breaker | THHN/THWN-2 in Conduit | Must connect to a dedicated, properly sized breaker. |
| All Metal Components | Grounding Electrode | Bare Copper Wire | Bonding must be continuous. NEC 690.41-50. |
Grounding and Final Grid Connection
Grounding is the single most important safety feature of the entire system. It protects people and equipment from electric shock. Every piece of metal—panel frames, racking, the inverter chassis, conduit—must be bonded together with a continuous grounding wire that runs to your home's main grounding electrode. Inspectors look at this first and foremost.
The very last step is connecting the AC output from your system to a new, dedicated breaker inside your main service panel. This is where your solar array finally shakes hands with the grid. Because this involves working inside a live electrical panel, it is a job that must only be done by a qualified electrician.
Commissioning Your System: Final Checks and Power-On

This is it—the final stage before your system starts producing its first clean kilowatt-hour. Commissioning is a meticulous, systematic verification process that locks in safety, compliance, and performance for the life of the system. Botched commissioning can fry expensive equipment or create serious safety hazards. This is your final quality check before handoff.
Pre-Power-On Safety Verifications
Before a single watt of power flows, you must run a series of dead-circuit tests with a multimeter.
First up are voltage and polarity tests on every single string. You'll check the open-circuit voltage (Voc) at the end of each string to confirm it's within the inverter's specified input range and matches your design. If that reading is too high, you risk instantly destroying the inverter. At the same time, you're verifying polarity—positive to positive, negative to negative.
Next is insulation resistance testing. This test is critical for confirming there are no ground faults, which happen when a current-carrying wire makes accidental contact with a grounded piece of equipment. A ground fault is a major fire and shock hazard, and this test ensures the integrity of every inch of wire insulation.
The Correct Power-Up Sequence
There's a right way and a very wrong way to power up a solar PV system. You must follow a specific order to protect the sensitive electronics inside the inverter.
Here’s the right way to do it:
- Turn on the AC Disconnect First: Energize the AC side of the system. This feeds the inverter stable grid power, allowing its internal controls to boot up and properly sync with the grid's voltage and frequency.
- Then, Turn on the DC Disconnect: Once the inverter is stable on the AC side, you can close the DC disconnect. This is the green light for the DC power from your panels to flow into the inverter for conversion.
Critical Mistake to Avoid: Never energize the DC side before the AC side. Hitting an unpowered inverter with a surge of DC power can destroy its internal components. The proper sequence is always AC first, then DC. For shutdown, you just reverse it: DC off first, then AC.
Inverter Configuration and System Monitoring
With the system safely powered up, it’s time to configure the inverter through the manufacturer's app or web interface. Here, you'll input grid parameters specific to your local utility's requirements, like voltage and frequency trip points, as mandated by standards such as UL 1741.
This is also when you'll connect the system to its monitoring platform. This connection is key, as it allows you and your client to track energy production in real-time, get performance alerts, and have hard data showing the system is operating exactly as designed.
The push for renewables is driving massive growth. Europe recently added 71.4 GW of new solar capacity, contributing to a global boom where over 600 GW of new solar was commissioned. This pushed the worldwide total past 2.2 TW. This incredible expansion makes robust commissioning practices more important than ever. You can dive into the numbers in the latest market snapshot.
Navigating the Final Utility Inspection for PTO
The last hurdle is the final inspection or "witness test" with your local utility company. They need to verify that your system is installed to code and meets all their interconnection requirements before they grant Permission to Operate (PTO).
The inspector will be looking for correct signage (placards per NEC 690), easily accessible disconnects, and a successful anti-islanding test to ensure your system shuts down safely during a grid outage. Have all your paperwork organized and ready: the approved permit set, equipment spec sheets, and the final inspection card. Once the utility inspector gives their approval, you can officially start exporting clean energy to the grid.
Common Solar Installation Questions Answered
Even the most detailed guide can leave you with questions. Here, we’ll tackle the most common queries we hear from installers, developers, and homeowners on the ground. These are the practical details that make the difference between a smooth installation and a costly headache.
How Do I Determine If My Roof Is Suitable for Solar Panels?
A suitable roof is the foundation of any successful solar project. It needs enough clear, unshaded space, it must be structurally sound, and its remaining lifespan should be at least 15-20 years.
Here are the key things to look at:
- Roof Age and Material: Asphalt shingle and metal roofs are ideal candidates, but only if they're in good shape. If your roof is old, you must replace it before the panels go up. Tearing a new array off in a few years to re-roof is an expensive mistake.
- Structural Integrity: A professional assessment is critical to confirm your rafters and structure can handle the added weight of the array, especially in areas with heavy snow loads.
- Orientation and Shading: In the Northern Hemisphere, a south-facing roof is the gold standard. However, east- and west-facing roofs are still very effective. The real killer is shade. A detailed analysis is required to spot any obstructions that will tank your output.
For Installers & Developers: Don't just eyeball the sun's path. Use a dedicated tool like a Solar Pathfinder or drone-based software to generate a precise shade report. This data is non-negotiable for creating accurate production estimates and is often required for financing or state rebate applications.
What Are the Most Common Mistakes in a DIY Solar Installation?
Going the DIY route carries significant risks. The most frequent—and dangerous—mistakes we see almost always boil down to two areas: roofing and electrical work.
- Improper Roof Flashing: This is the #1 cause of roof leaks after a solar install. Every single penetration must be perfectly sealed with manufacturer-approved flashing. No shortcuts.
- Incorrect Torque on Hardware: Overtightening bolts can crack panel frames. Under-tightening them risks a panel flying off your roof in a high wind event. A calibrated torque wrench isn't optional; it's essential.
- NEC Code Violations: This is where things get truly dangerous. Failing to properly ground the system, using the wrong type of wire, or making unsafe connections in the main service panel are all critical safety failures that can lead to fires or electrocution. These errors will also guarantee a failed inspection.
Can I Install Solar Panels Myself, or Do I Need a Professional?
Legally, you might be able to handle the mechanical parts of the installation yourself. However, you're still working at dangerous heights and dealing with lethal DC voltages. For safety and compliance, almost every jurisdiction requires a licensed electrician to make the final grid connection.
For the vast majority of people, hiring a certified professional is the smartest path forward. Look for an installer with NABCEP (North American Board of Certified Energy Practitioners) certification. This is the industry gold standard and ensures your project is installed safely, efficiently, and up to code. A professional job also protects your warranties and guarantees the system will pass all inspections.
How Long Does the Permitting and Inspection Process Take?
This is the big "it depends" of any solar project. Timelines can vary wildly depending on your local municipality and utility company, ranging anywhere from a few weeks to several frustrating months.
Here’s a rough breakdown of the administrative journey:
- Permit Submission: Your complete system design plans get submitted to your local building department (AHJ) for review.
- Interconnection Application: At the same time, you'll apply to your electric utility for an interconnection agreement.
- Final Inspections: Once the physical installation is done, you’ll have at least two final inspections—one from the building department and another from the utility company—before they grant that all-important Permission to Operate (PTO).
Because these bureaucratic hurdles can take time, it is crucial to get the paperwork started as early as possible.
Navigating these questions is easier with a partner who understands the realities of procurement, compliance, and logistics. Portlandia Electric Supply provides the in-stock components, NABCEP-certified design support, and bundled freight solutions to keep your project on track.