
How to Size Circuit Breakers for Safety and Compliance
Sizing a circuit breaker correctly is a multi-step process for any electrical professional: you calculate the total load, apply the National Electrical Code's (NEC) 125% rule for continuous loads, and then match that to the right wire gauge. It's a common misconception, but let's be crystal clear: the breaker's job is to protect the wire, not the appliance. Its entire purpose is to prevent wiring from overheating and creating a catastrophic fire hazard. For installers, EPCs, and facility managers, getting this right is the difference between a successful, compliant project and a dangerous, costly failure.
Why Correct Circuit Breaker Sizing Is Non-Negotiable

For professional installers, EPCs, and facility managers, this isn't just about ticking a box on a permit application. It's the absolute foundation of a safe, reliable, and code-compliant electrical system that passes inspection the first time.
Get the sizing wrong, and you're stuck with two bad outcomes. An undersized breaker will cause constant, frustrating trips. An oversized one is far worse—it's a silent threat that fails to protect the circuit, creating a direct risk to your equipment, the building, and anyone inside it.
Think of the breaker as a sacrificial component. It’s engineered to be the designated weak link in the chain, designed to fail long before the wiring does. When a wire gets overloaded, it heats up, its insulation melts, and you've got the perfect recipe for a short circuit or a catastrophic fire. The breaker is the safety switch that trips and cuts the power before you ever get to that danger point.
The Critical NEC 125% Rule
One of the most important guidelines we follow comes straight from the National Electrical Code (NEC): the 125% rule. This applies specifically to continuous loads, which are defined as any load that runs for three hours or more. Think commercial lighting, HVAC systems, or an EV charger—these are perfect examples.
The NEC requires the breaker to be rated for at least 125% of that continuous load. So, if a bank of LED lights in a warehouse pulls a steady 16 amps, the math is simple:
16A × 1.25 = 20A
That means a 20-amp breaker is the smallest size you can legally and safely use for that circuit. This 25% headroom is a critical safety buffer, ensuring the breaker doesn't get hot and trip under normal, sustained operation. The evolution of these safety standards is always ongoing, which you can see in market analysis reports. For a deeper dive into industry trends, you can discover more insights about the circuit breaker market on imarcgroup.com.
For Installers & Facility Managers: This is where projects pass or fail. An undersized breaker guarantees nuisance tripping and angry calls from the client. An oversized one is a blatant code violation and a massive fire hazard, letting the wire carry way more current than it's rated for. Getting this wrong means failed inspections, project delays, and expensive rework.
At the end of the day, mastering breaker sizing is what separates the pros from the amateurs. It’s how you guarantee:
- Safety and Compliance: You’re building a system that prevents electrical fires and sails through inspections.
- System Reliability: No more nuisance tripping that disrupts operations and damages your reputation.
- Equipment Longevity: You're actively protecting expensive equipment from being fried by overcurrent.
Standard Breaker Sizes vs Continuous Load Capacity
To make this even easier, here's a quick reference table. It shows the maximum continuous load you can safely put on standard breaker sizes, based on that critical NEC 125% rule. This is a great cheat sheet for quickly matching a known load to the right breaker.
| Standard Breaker Rating (Amps) | Maximum Continuous Load (Amps) | Common Application |
|---|---|---|
| 15A | 12A | Standard residential lighting, general-use outlets |
| 20A | 16A | Kitchens, bathrooms, garages, dedicated appliances |
| 30A | 24A | Electric water heaters, clothes dryers |
| 40A | 32A | Electric ranges, small subpanels |
| 50A | 40A | Large electric ranges, EV chargers, large subpanels |
| 60A | 48A | Larger HVAC units, some EV chargers |
This table simplifies the math for the most common circuits you'll encounter. For instance, if you have an EV charger that pulls a continuous 40A, you can immediately see it needs a 50A breaker (40A / 0.80 = 50A). Always round up to the next standard breaker size if your calculation falls between two ratings.
Calculating Your Total Electrical Load
Before you even touch a breaker, you have to do the math. A solid load calculation is the foundation of a safe circuit, telling you exactly what demand it’s going to face. Get this wrong, and you're setting yourself up for problems. The whole thing boils down to one critical question: is the load continuous or non-continuous?
A continuous load is anything that's going to pull its maximum current for three hours or more. We’re talking about the workhorses: commercial lighting, a server room's HVAC system, or that EV charger working all night. These devices generate a lot of sustained heat, and that’s what we need to account for.
Then you have your non-continuous loads. These are the sprinters—they run in short bursts. Think of a shop vac, the office microwave, or a garage door opener. They pull power intermittently and don't put the same kind of long-term thermal stress on the circuit.
The Practical Math of Load Calculation
To figure out your total load, you'll start by adding up the amperage of everything on that circuit. You can find the amp (A) or watt (W) rating right on the equipment's nameplate. If it's listed in watts, a quick division by the voltage (typically 120V or 240V in the US) will give you the amps.
The most important step comes next. For any loads you identified as continuous, you must apply the NEC’s 125% rule. This isn't optional; it's a critical safety buffer to handle the extra heat they generate.
If you want to dive deeper into the process with more examples, we have a complete walkthrough on how to calculate electrical load.
This flowchart breaks down the core steps for getting your numbers straight and applying the right demand factors.
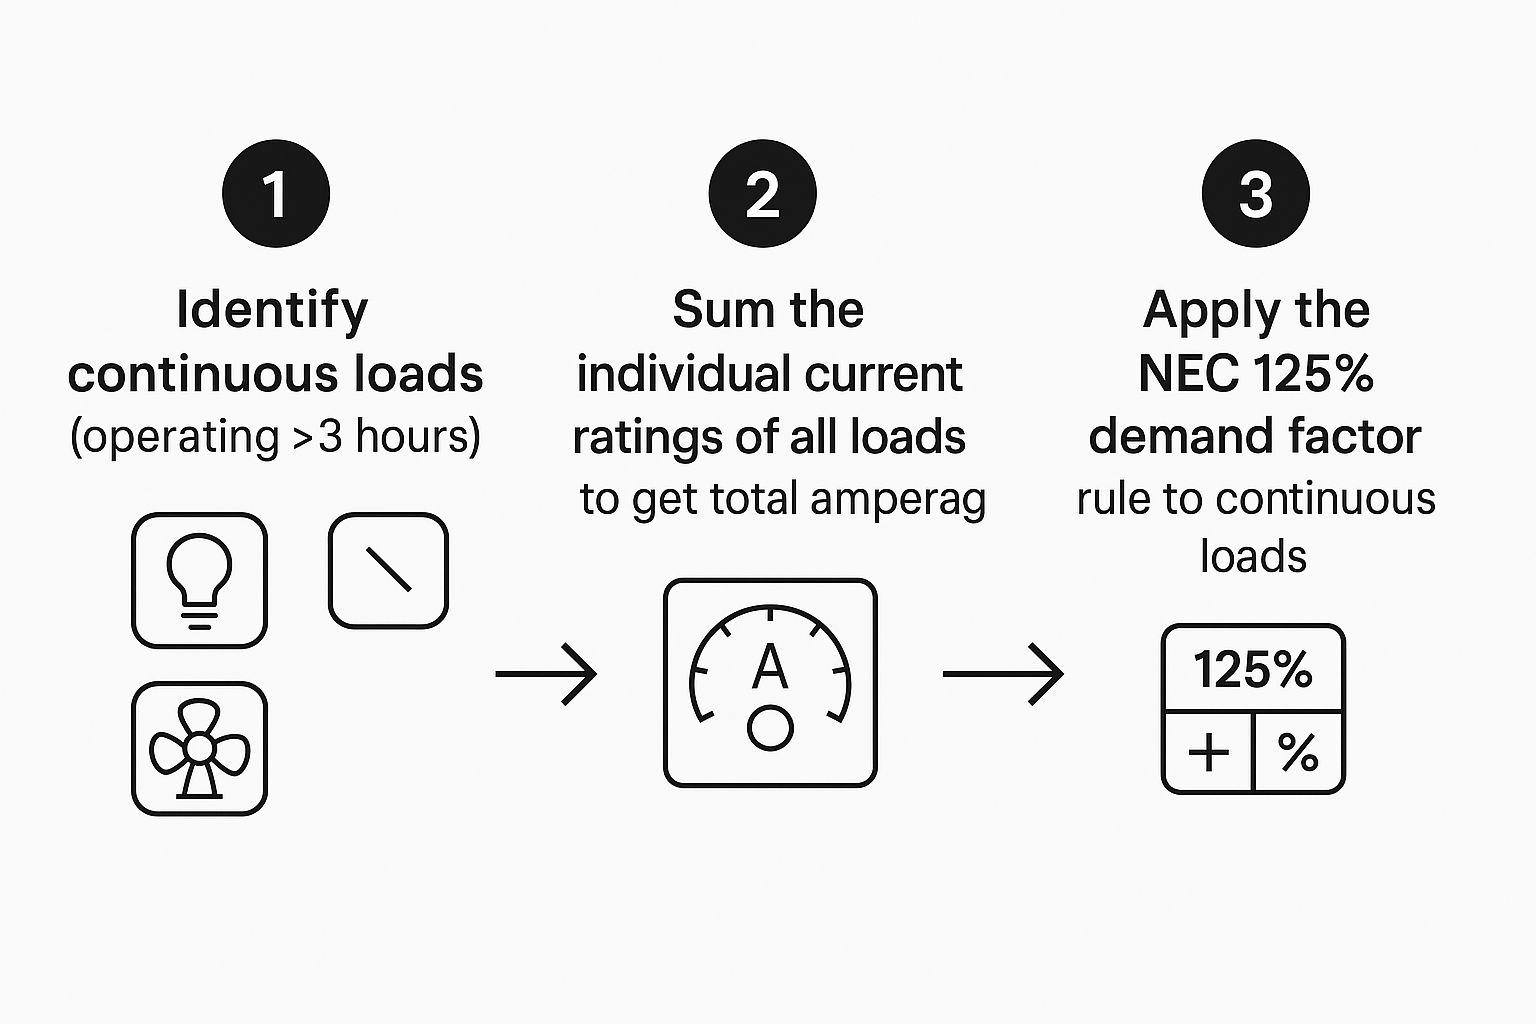
As you can see, that 125% multiplier is only applied to the continuous load before you add the non-continuous loads back into the equation.
Real-World Calculation Scenarios
Let's walk through a common job: wiring a dedicated circuit in an office that has new LED lighting and a couple of other devices.
Scenario Breakdown:
- Continuous Load: A bank of high-efficiency LED fixtures pulling 13 amps.
- Non-Continuous Loads: A heavy-duty printer at 5 amps and a water cooler at 2 amps.
First, we hit that continuous load with the 125% rule: 13A (Continuous) x 1.25 = 16.25A
Now, add the non-continuous loads back in: 16.25A + 5A + 2A = 23.25A
Pro Tip for Developers and EPCs: On large commercial projects, don't forget about demand factors. The NEC recognizes that in a big facility like an apartment complex or office park, not everything will be running at once. Properly applying these factors from NEC Article 220 can significantly lower your required service size, saving a ton of money on gear and infrastructure without cutting any corners on safety.
Our final calculated load is 23.25A. This means we have to step up to the next standard breaker size, which is 30 amps. A 25-amp breaker is cutting it too close and will likely cause nuisance trips, while a 20-amp is just a flat-out code violation. This isn't guesswork—it's how you engineer a circuit for reliability and safety.
Matching Breaker Size to Wire Ampacity
Once you've calculated your total load, you're at one of the most critical points in any electrical job: matching the circuit breaker to the wire it's supposed to protect. This isn't just a suggestion; it's the absolute foundation of electrical safety. A breaker has one job—to trip before the wire’s current-carrying capacity, its ampacity, is ever exceeded.
But ampacity isn't a simple, fixed number. It's a dynamic rating that changes based on real-world conditions, and every good installer knows how to account for them.
What Really Determines Wire Ampacity
The amount of current a wire can safely handle before it starts to dangerously overheat depends on more than just its thickness. The National Electrical Code (NEC) lays this all out, primarily in Table 310.16, and it boils down to a few key variables:
- Wire Gauge (AWG): This is the most obvious one. A thicker wire, like a 10 AWG, has lower resistance and can carry more current than a thinner 14 AWG wire. Simple physics.
- Insulation Type: The material wrapped around the copper conductor has a temperature rating—typically 60°C, 75°C, or 90°C. Common insulations like THHN or THWN have higher heat tolerances, which lets them handle more current.
- Ambient Temperature: A wire running through a blistering hot attic in Phoenix can't shed heat as well as one in a cool basement. The hotter the environment, the less current a wire can safely carry. You have to derate its ampacity accordingly.
Getting this right isn't just about following the rules; it's about preventing fires. Over the years, the NEC has tightened these standards for good reason. Installations that strictly follow these sizing practices have been shown to have up to 40% fewer electrical faults.
Using the NEC Ampacity Tables Correctly
NEC Table 310.16 is your bible for this. It gives you the baseline ampacity for different wire gauges and insulation types. While you're at it, understanding different wiring systems can be a lifesaver. For low-voltage work, for example, a guide on Thermostat Wiring Color Codes can clarify things quickly.
For Installers: A Critical Compliance Point Always use the ampacity rating from the column that matches the lowest temperature rating of any component in the circuit. Most terminals on breakers and devices are rated for 75°C. That means you'll almost always use the 75°C column from Table 310.16, even if the wire itself has a 90°C insulation rating. Using the higher 90°C ampacity for sizing the breaker is a common and dangerous mistake.
The final, adjusted ampacity is what determines your breaker size. If you're dealing with more complex load calculations, our guide on how to convert kilowatt-hours to amps is a great resource to have handy.
Wire Gauge Ampacity and Recommended Breaker Size
To make things easier, here’s a quick-reference table that shows the ampacity for common copper wire sizes based on the 75°C column—the one you'll use most often—and the correct standard breaker size to pair with it.
| Copper Wire Gauge (AWG) | Ampacity at 75°C (THHN/THWN) | Maximum Standard Breaker Size (Amps) |
|---|---|---|
| 14 AWG | 15A | 15A |
| 12 AWG | 20A | 20A |
| 10 AWG | 30A | 30A |
| 8 AWG | 50A | 50A |
| 6 AWG | 65A | 60A |
| 4 AWG | 85A | 80A |
Take a close look at the 6 AWG and 4 AWG rows. Notice that we have to round down to the next standard breaker size (60A for 65A ampacity, and 80A for 85A ampacity). This is a crucial safety rule in the NEC. Unless your specific load calculation meets some very strict exceptions, you always protect the wire with the next standard breaker size down, not up. This ensures the wire is always safely overprotected.
Sizing Breakers for Specialized Loads
Sizing a breaker for a string of lights or a few outlets is straightforward enough. But any seasoned pro will tell you the real challenges pop up with specialized loads. These aren't your typical circuits—they have unique demands that require a much deeper dive into the NEC and the equipment itself.
Take motors, for instance. The moment a motor kicks on, it draws a massive, split-second surge of power called inrush current. This spike can be several times the motor's normal running amperage, which would cause a standard breaker to trip instantly, thinking it's a dead short.
That’s why NEC Article 430 gives us specific rules just for motors. It often allows you to size the breaker significantly higher than the motor's full-load running amps, giving it the headroom to handle that initial kick without creating nuisance trips.
HVAC, EV Chargers, and Dedicated Appliances
HVAC systems are a classic example. Their compressors and fan motors create the same kind of startup surge. This is why you'll see breakers for these units stamped with an HACR-rated (Heating, Air Conditioning, and Refrigeration) designation. They're specifically designed to tolerate the unique inrush characteristics of these motor loads. Getting this right is especially important for larger equipment; for instance, understanding the specific requirements for a 4-ton AC unit is absolutely critical for proper breaker sizing.
Electric vehicle (EV) chargers are another beast entirely. These are almost always classified as a continuous load, which means the 125% rule is non-negotiable. A 40A Level 2 charger absolutely requires a 50A breaker and wire rated to handle that load. This is not the place to cut corners. These circuits pull a lot of power for hours on end, putting serious thermal stress on every component.
Even dedicated appliance circuits, like those for electric ranges or water heaters, have their own quirks. A big electric range might get a 50A circuit, even if its total potential wattage seems like it should require more. This is thanks to NEC demand factors, which acknowledge the reality that you’re probably not running all four burners and the oven on max at the same time.
Solar Backfeed Breakers
Solar installations bring a whole different set of rules to the table, specifically with the backfeed breaker. This is the breaker that connects your solar inverter to the main panel. It's the gateway that allows the energy you generate to flow back into your home's circuits or even out to the grid.
For Solar Installers & EPCs: Sizing a solar backfeed breaker is all about the NEC's 120% rule (found in NEC 705.12). The rule is simple: the rating of the main breaker plus the rating of the solar backfeed breaker can't be more than 120% of the panel's busbar rating.
Let's run the numbers for a standard 200A panel with a 200A main breaker, which is a super common residential setup:
- Calculate Max Busbar Capacity: 200A (busbar) × 1.20 = 240A
- Find Available Capacity: 240A - 200A (main breaker) = 40A
The math doesn't lie. The largest solar backfeed breaker you can legally and safely install on this panel is 40 amps. Pushing past this limit compromises the safety of the entire panelboard. If the client needs more solar, you'll have to look at more complex solutions like a line-side tap or a full panel upgrade. Getting these specialized calculations right isn't just about passing inspection—it’s about ensuring the system is safe, compliant, and performs as it should.
Common Sizing Mistakes and How to Avoid Them

It’s one thing to understand the theory, but what happens out in the field is where the real learning happens. I’ve seen small mistakes in circuit breaker sizing snowball into massive problems. These aren't just academic slip-ups; they lead to failed inspections, costly rework, and genuine safety hazards.
Knowing the common pitfalls is half the battle. For procurement managers and project owners, these issues hit the bottom line hard. An installation that isn't up to code doesn't just need a quick fix—it can bring a whole project to a standstill, wrecking timelines and budgets.
Precision is more critical than ever. The global circuit breaker market was valued at around USD 9.16 billion in 2024 and is expected to reach USD 12.06 billion by 2033. This growth isn't just about more buildings; it's driven by tighter regulations demanding exact sizing to protect our grids from an ever-growing list of loads. Read the full research about the circuit breaker market.
Misapplying Wire Ampacity Ratings
This is probably the most frequent and dangerous mistake I see. An electrician might see that a wire has a 90°C insulation rating, which lets it handle more current without melting. But here's the catch: the terminals on your breakers and outlets are almost always rated for only 75°C.
Critical Compliance Watchout: You absolutely must size your breaker based on the lowest temperature rating of any component in the circuit. In practice, this almost always means using the 75°C ampacity column from NEC Table 310.16. Sizing a breaker to the 90°C rating is a major code violation that will cause the wire to dangerously overheat right at its connection points.
This single error is a primary cause of melted terminals and electrical fires. It’s a preventable risk. To see how to protect your projects, take a look at our guide on how to prevent electrical fires.
Ignoring Voltage Drop on Long Runs
Ampacity isn't the whole story. When you're dealing with long wire runs—think large commercial buildings or wiring to an outbuilding on a big property—voltage drop becomes a real problem. The farther electricity has to travel, the lower the voltage gets at the other end.
A significant drop can cause motors to burn out, lights to flicker, and sensitive electronics to fail. To fix this, you often have to upsize the wire gauge beyond what the ampacity tables call for. Forgetting this step leads to performance issues that are a nightmare to diagnose and fix after the drywall is up.
Oversizing the Breaker for "Convenience"
This is a tempting shortcut that can have disastrous consequences. If a circuit keeps tripping, someone might think swapping a 20A breaker for a 30A one will solve the issue. This is one of the worst things you can do.
A breaker’s number one job is to protect the wire. If you put 12 AWG wire (rated for 20A) on a 30A breaker, you’ve just eliminated its protection. That wire can now draw nearly 30 amps, causing it to get incredibly hot long before the breaker ever trips. It’s a massive fire hazard. Always find the reason for the trip; don't just override the safety system.
Common Questions on Sizing Circuit Breakers
Even when you know the code, certain situations on the job site can make you second-guess your plan. We get it. Let's run through a few of the most common questions we hear from the field about getting breaker sizes just right.
Can I Use a Breaker Rated Lower Than the Wire?
Yes, absolutely. This is a common and perfectly safe practice.
Think about it: the breaker’s entire job is to protect the wire from overheating. If you have a 12 AWG wire rated for 20 amps, but you install it on a 15-amp breaker, you’re just giving that wire extra protection. The breaker will trip long before the wire even gets close to its thermal limit.
You see this a lot when an installer has 12 AWG on the truck but needs to protect a specific piece of equipment that calls for a 15-amp circuit. It’s a safe, code-compliant solution.
What Is the 80% Rule?
You'll hear old-timers and inspectors talk about the "80% Rule" all the time. It's really just the flip side of the NEC's 125% calculation for continuous loads. Same rule, just looked at from a different angle.
The 80% rule is a guideline stating that a circuit should not be loaded beyond 80% of the breaker's rating if the load will run for three or more hours. For a 20-amp circuit, that means your continuous load shouldn't exceed 16 amps (20A x 0.80).
This buffer is designed to prevent overheating and nuisance trips for things that run for long stretches, like lighting or heating equipment.
How to Size a Breaker for a 240V Water Heater
Let's walk through a real-world example: a standard 4,500-watt, 240-volt electric water heater. This is one of the most common circuits you'll run into.
First, you need to find the full load amperage.
- 4,500 Watts / 240 Volts = 18.75 Amps
Because a water heater is considered a "continuous load" by the NEC (it can run for 3+ hours), you have to apply the 125% factor.
- 18.75 Amps x 1.25 = 23.44 Amps
You can't buy a 23.44-amp breaker, so the code requires you to round up to the next standard size. That lands you squarely on a 30-amp breaker, paired with 10 AWG copper wire.
What About Breakers for Solar and EV Chargers?
Absolutely. Specialized equipment often demands more than just a standard breaker. EV chargers, for instance, nearly always require GFCI (Ground Fault Circuit Interrupter) breakers for safety. It's a non-negotiable life-safety issue.
With solar installations, the breaker that connects the inverter to your main panel is called a backfeed breaker. The NEC has strict rules about where it can be placed—it has to be located at the opposite end of the busbar from the main breaker to manage the electrical load safely.
These aren't just suggestions; they're code requirements. Always, always check the manufacturer’s specs and the latest NEC edition before wiring up these systems.
Need to source breakers, wire, and complete solar or EV charging kits for your next project? Portlandia Electric Supply has the in-stock inventory and expert support to ensure you get the right components, fully compliant and delivered on time. Request a Bulk Quote today.